Print Guide
Yay! We're thrilled that you want to give riso a try.
To get started, take a look at our comprehensive print guide which covers all the essentials for creating Riso-ready artwork. For a handy reference on printing, inks and paper stocks you can download our PDF print guide. If you'd like see samples before making a decision, we’ll have our new swatch pack available to purchase online very soon.
If you're already familiar with the process we've got you covered; you can download artwork templates and digital colour swatches, before ordering prints via our order form or ready-to-go packages. Don't worry if you're a beginner or need a bit more guidance, we're happy to help! Just request a quote or reach out to us directly.
-
Artwork is sent to the Riso via a computer connection or manually through the scanner bed, reminiscent of a photocopier. Artwork is then burned onto a roll of thermal-sensitive paper, which wraps around the print drum. Ink is forced through the rotating metal mesh of the drum and paper, creating a stencil from which hundreds or thousands of prints can be made. Each layer is printed using a separate drum, with inks overprinting to build up the artwork. Stencils can’t be saved between print jobs, so all copies are printed in one go.
It's important to note that Risograph doesn't promise perfection; final prints will carry a unique character distinct from digital artwork and ink colours will not match exactly what you see on screen. Prints are manually aligned and adjusted, a process that brings with it the charm of mis-registrations and tiny imperfections. These quirks and idiosyncrasies are what sets Risograph printing apart from other processes!
-
Risographs are spot colour printers, meaning each shade comes straight from the tube. We carry a palette of 34 inks which can be printed independently, or overprinted with one another to create new hues and interesting effects - the only exception to this is metallic gold, which sits on the surface of other inks rather than mixing. The inks also change appearance depending which colour paper is chosen - for example, fluorescent pink on yellow paper will appear more ‘orange’.
Overlaying inks is a handy technique resulting in less stencils and cost. A good way to visualise overlaying colours is to set your digital artwork layers to ‘screen’ and ‘multiply’ in Adobe. You can choose to set your artwork to overlay where colours will overprint and mix, or designs can be cut out for colours to print independently. Adding trapping to your design will help minimise any visible gaps from mis-registered layers.
Using lower opacities of ink is recommended for mixing shades and printing large blocks of colour, which helps to reduce the wetness of the paper and printer jams. Gradients of ink can go from light to dark, or allow two colour to fade into each other.
-
Each layer is printed one at a time and registration is controlled manually, therefore one of the Risograph's signature quirks is that you’ll often find a couple of millimetres mis-alignment between layers. The more layers in your design, the higher the chance of mis-registration. If your design demands precision down to the last millimetre such as very fine details or doubled up text, you may want to use a different print method with more accuracy. Double-sided prints can also be tricky to align between back and front, so you should make allowances for this in your artwork. You won’t achieve perfect alignment with Risograph, but that’s part of the fun!
-
The printers accept A3 sized paper (297 x 420mm) and the maximum printable area is 287 x 410mm - a 5mm blank margin needs to be left around the A3 sheet, as the Riso can’t print full bleed. We print onto A3 paper and trim if needed, for example you’ll get 2 x A4 copies / 4 x A5 copies / 8 x A6 copies from each sheet.
We can trim to custom sizes within the 287 x 410mm printable area, allowing for crop marks and bleed. We have a range of artwork templates available to download for regular and full bleed designs.


-
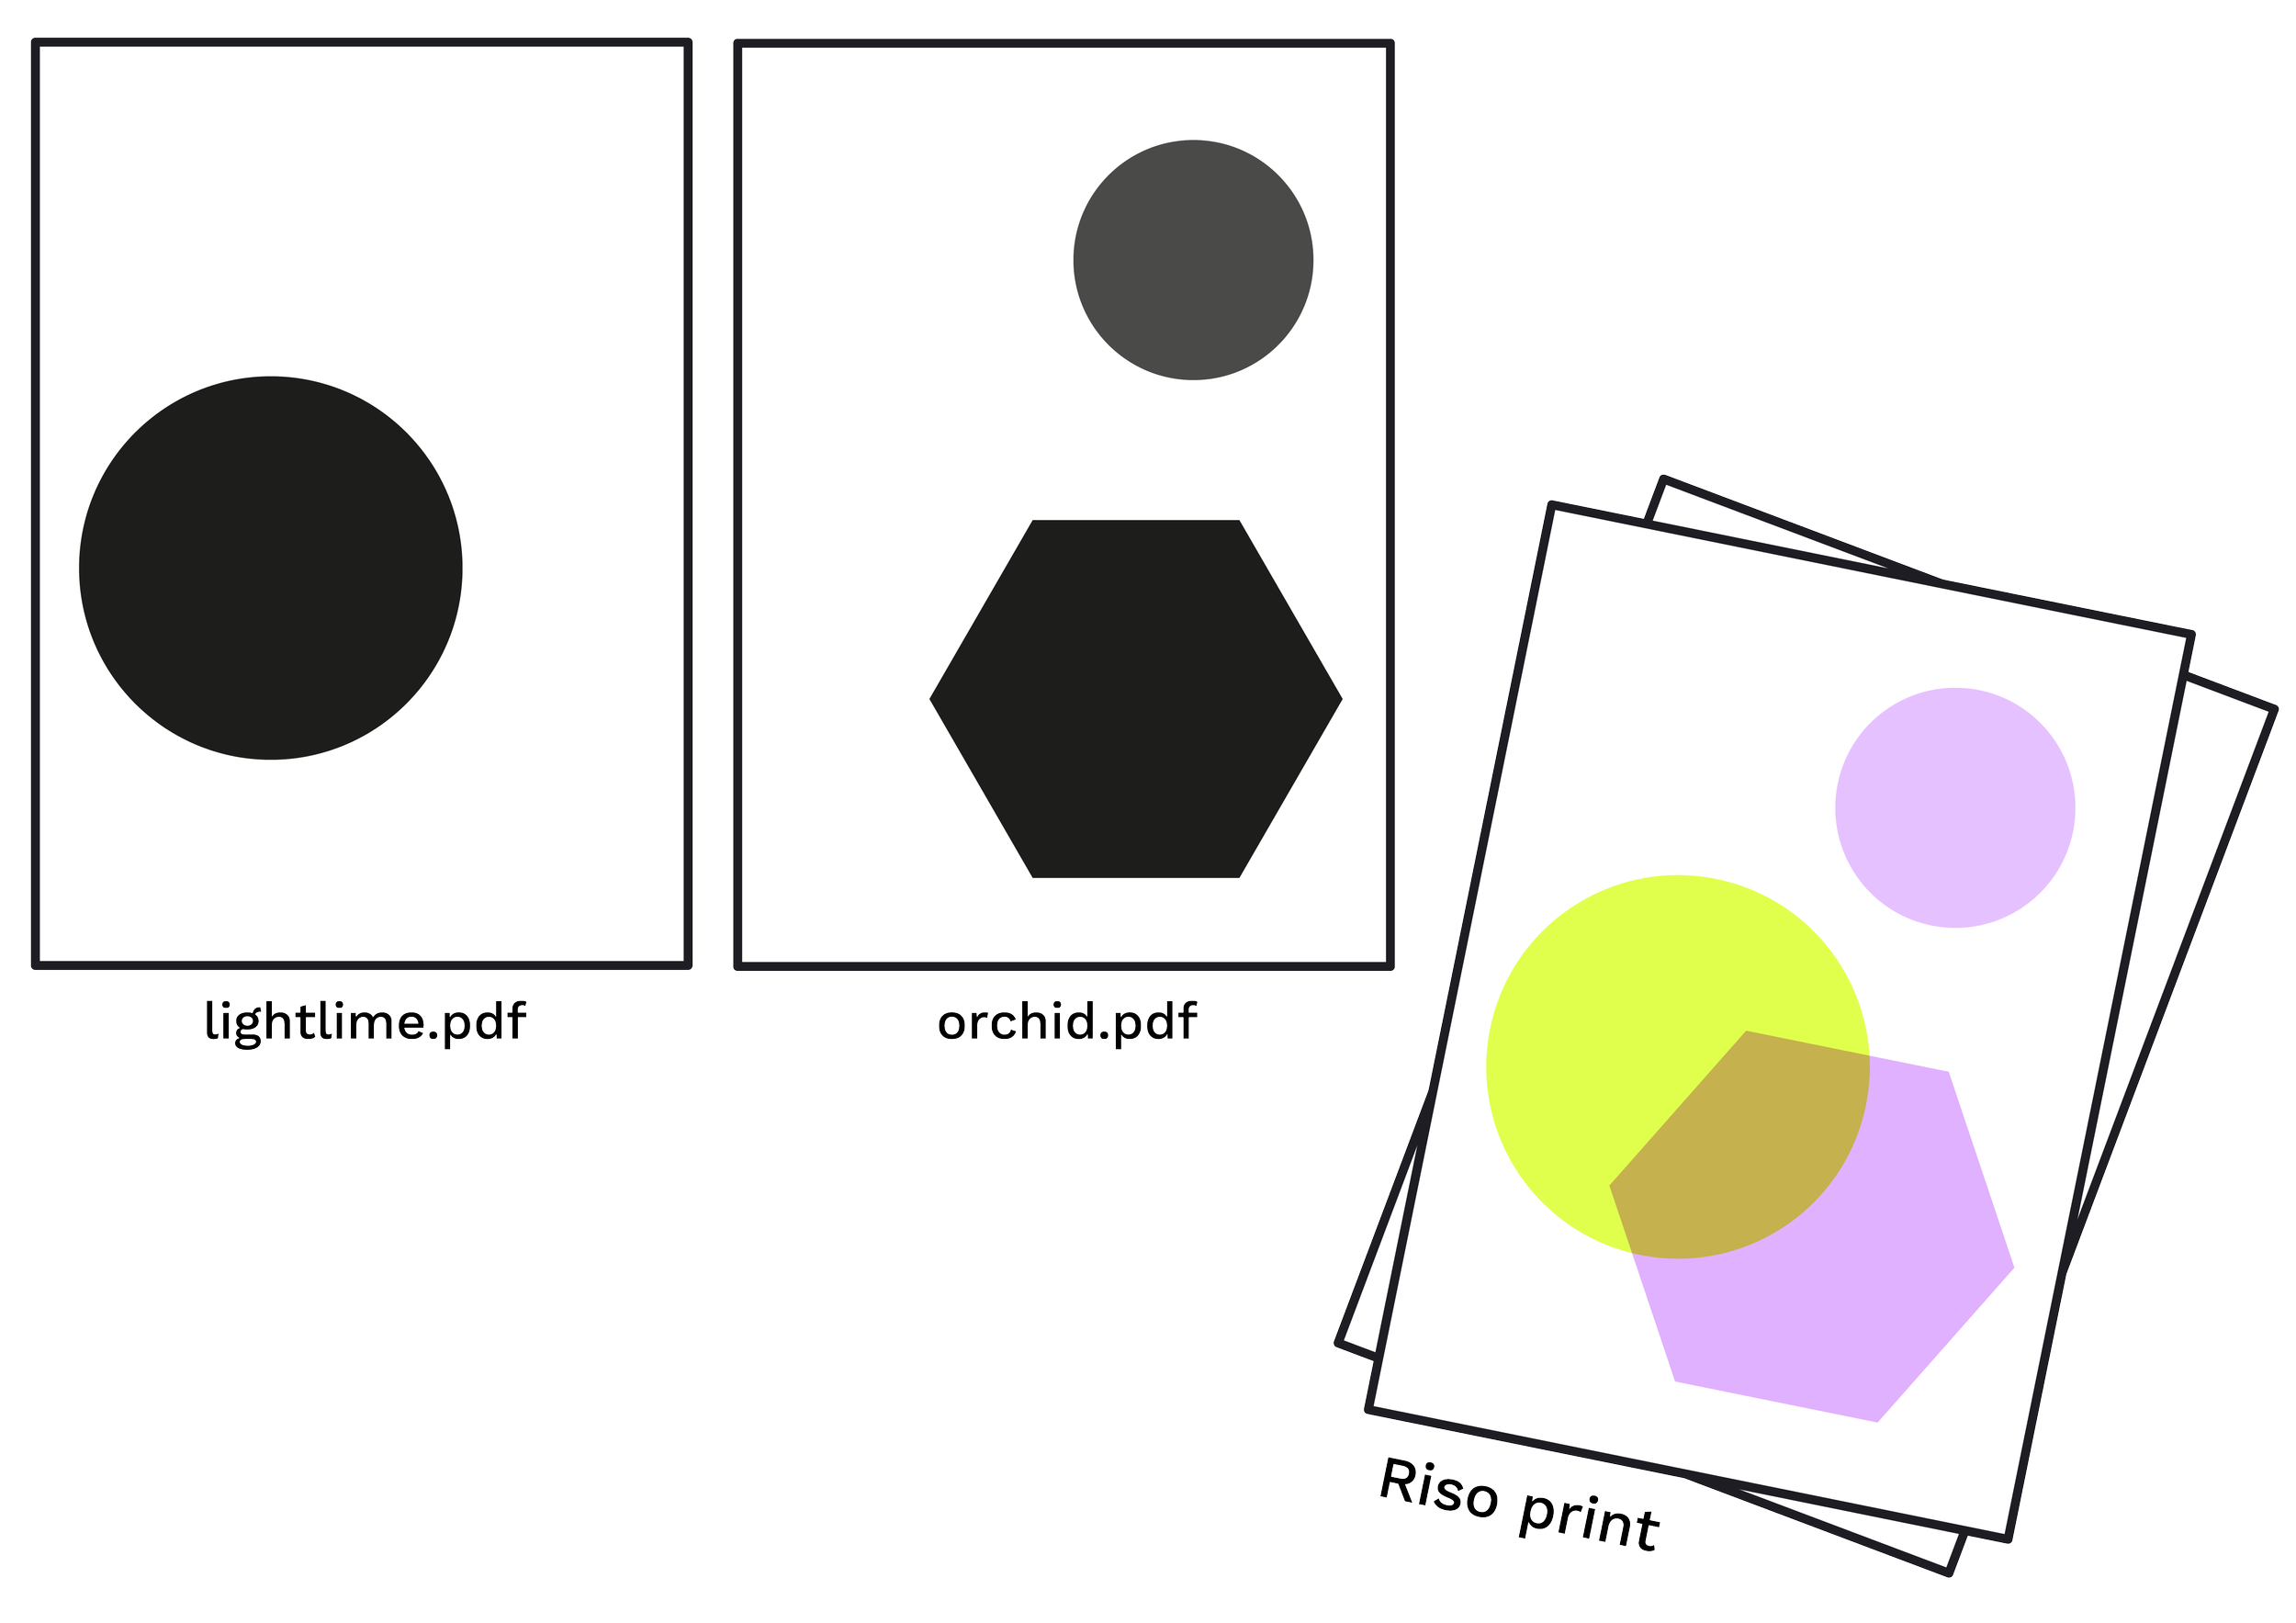
As each ink layer is printed individually, we require a separate digital file for each colour (very similar to screen print layers). Each file should be named with the ink colour you wish to use, for example ‘mediumblue.pdf’. Files should be saved in PDF format and set to A3 size (297 x 420mm) at 300dpi, with no embedded bleed or crop marks. We also require a full colour reference file so we know how you'd like your artwork to look.
It's much easier to set up individual artwork layers at the start of a project, as it’s difficult to separate out if you've already flattened an image. Photoshop, Illustrator and Indesign layers are easy to keep track of and rename as you go. We personally love creating artwork with Procreate on the iPad, as this works in a similar way and artwork can be exported in layers.
You don’t need to add a texture to your artwork, as the Riso’s natural ‘grain’ setting gives a soft, even finish (see our swatch pack to see this in person). The printers also have a ‘screen’ setting which produces an even, dot-like halftone texture. We print 90% of jobs on the ‘grain’ setting, but let us know if you’d prefer to use ‘screen’. You can also set your own halftones and textures in your artwork, for more creative control.
Text should be flattened or outlined and set to 6pt or larger - vector files saved as PDFs are best for crisp results, compared to raster files. The Risograph reads levels of black and cuts stencils based on how opaque each layer is. For example, 100% black in your digital file will print at 100% ink colour and 50% black will print at 50% ink colour. Black should be set to HEX #00000 or 100% K, saved as grayscale or RGB format (CMYK can make blacks appear ‘grey’ when saved).
-
Heavy Ink Coverage
Steer clear of ink overload; large patches of concentrated ink can lead to the paper jamming in the machine or getting stuck to the drum. For large areas of colour, aim for an opacity of about 85% or less. Too much ink can also create uneven ‘waves’ and imperfections due to the way heavily inked paper peels away from the drum. Swapping out a full colour background for coloured paper can achieve a better result.
Roller & pick-up marks
Rubber rollers handle the top 50mm or so of the paper, so keep ink lighter here to avoid jams and roller marks. A plastic needle guides the paper out of the printer, which can cause a line to appear if it drags through very heavy ink. Imperfections should be expected in multi-colour or double sided prints, although we do try to minimise where possible and may suggest altering artwork for a better result. For those pesky roller marks, a clean pencil eraser can help to remove them from clean paper.
Ink transfer & smudging
Paper is stacked when entering and leaving the Riso printer, therefore ink can transfer between prints. We recommend blotting paper (at an additional cost) for double-sided trimmed prints, as the pressure of the guillotine clamp will also cause ink transfer from print to print. Since Riso ink never truly dries (similar to a newspaper), handle prints with care to dodge fingerprints and smudging. Reducing the opacity of your layers will also help to avoid transfer marks and smudging.
-
Most artworks are sent to us in separate layers which are printed one at a time, much like screen printing. However, the Riso is capable of printing full colour artworks and photographs, using a faux-CMYK method which mimics the way digital images are produced.
There’s a great (free!) app called Spectrolite which we use to split full colour images into layers, which are then output as PDF files ready for Riso printing. It’s pretty straightforward to use and we have digital colour swatches of our ink palette available to download, which you can drop into the app. Otherwise, it’s easy to select the ink colours you wish to use and create your own palettes.
Combinations of 2, 3 or 4 ink colours can be used and prints have the same mis-registration and imperfections as regular Riso printing, producing offbeat and surprising results! Drop us an email if you’d like to chat about full colour printing along with a sample of your artwork or photograph, so we can advise more.
-
We offer a range of finishing options in-house, in addition to our Riso print service - send a message online or email us directly for a quote. We can also outsource other finishing options to our list of contacts, arranging the process for you from start to finish.
Guillotine trimming
We can trim to any custom size within an A3 sheet. Standard sized prints (A4, A5, A6) can be ordered directly online, or we can send a bespoke quote and template for other dimensions.Saddle stitch binding
Staple binding along a folded or flat spine for zines and publications. The maximum publication size for stapling depends on the page count and paper thickness.Singer sewn / 3-hole binding
A really lovely option for zines and publications. A straight stitch is run along the spine using a vintage Singer machine, or thread is tied between 3 holes for a more handmade look. Almost any thread colour can be sourced and we can quote for this service from one of our contacts.Coil binding
We stock black, white, clear, yellow, orange, pink and aqua plastic coils as standard and can order in custom colours for large orders. Although coils are plastic, they are manufactured in the UK per order (meaning no waste) and they can be reused or recycled with other plastics.Perfect binding
Hot glue is used to fix loose pages inside a creased cover (most magazines are perfect bound). This allows for a much larger page count and the cover can also be laminated for a protective finish. This is outsourced to one of our contacts and requires a bespoke quote.Creasing & folding
We can crease or fold leaflets, greeting cards, invitations or posters to any custom size. We have set options available as print packages, or you can contact us for a bespoke quote.Corner rounding / thumb cut
Adds a nice touch to postcards, business cards, invitations and packaging.Lamination
Great for packaging and publication covers, to help avoid smudge marks and offer a protective seal. This is outsourced to one of our contacts and requires a bespoke quote.Laser / die cutting
Precision custom shaped trimming for a range of creative projects - laser cutting is more suitable for thicker stocks and die cutting requires a metal stamp to be made, so is more suitable for larger runs. This is outsourced to one of our contacts and requires a bespoke quote.Custom
We’ve been asked to work on a number of completely custom projects such as beer mats for a wedding reception, labels for pickle jars and perforated tickets for an event. Get in touch to chat about any bespoke requirements you have!

We stock 34 Riso ink colours, the largest palette in the UK!
𖦹
We stock 34 Riso ink colours, the largest palette in the UK! 𖦹
Download our PDF print guide to see the HEX code equivalent for each ink colour. These won’t match the inks exactly, but are a useful approximation. Download digital colour swatches for Abode, Procreate and Spectrolite.
Inks

Black

Light Grey

Federal Blue

Medium Blue

Blue
Aqua

Mint

Seafoam

Light Teal

Teal

Moss

Green

Kelly Green
Fluo Green

Light Lime

Fluo Yellow

Yellow

Sunflower

Fluo Orange

Orange

Copper

Metallic Gold

Coral

Red

Bright Red

Fluo Red

Cranberry
Fluo Pink

Bubblegum

Light Mauve

Bisque

Orchid

Violet

Purple
We keep a selection of sustainable and recycled paper stocks at the studio. Download our PDF print guide for more information about each and the available weights. We order in coloured paper specially per job.
Paper

Echo

Context Natural

Tree Free

Alga Carta
Steinbeis